The best bread proofing box for most home bakers is the Brod & Taylor Folding Proofer ($160-200) — it holds 70-195F within 1-2 degrees, folds flat for storage, and doubles as a slow cooker and yogurt maker. If you already own a sous vide, a circulator clipped to an insulated cooler is the best DIY proofing box. On a budget, a heated seedling mat plus an Inkbird thermostat gets you to plus-or-minus 2-3F for under $80.
Try It Yourself
The Starter Clock
Track your sourdough starter fermentation — see when it peaks, when to use it, and what flavor to expect.
Open ToolWhy a Proofing Box Is a Game-Changer for Home Bakers
The single biggest variable in bread baking is temperature. A dough targeted for a 78F desired dough temperature will bulk-ferment in roughly 4 hours at 78F, 6 hours at 72F, and 3 hours at 82F. Without temperature control, you end up chasing the clock against an environment that refuses to cooperate — kitchens are cold in winter, hot in summer, drafty near windows, and warm above the dishwasher.
A proofing box (also called a proofing cabinet or proofer) is an insulated chamber with a heater and a thermostat that holds your dough at a precise temperature for bulk fermentation and final proof. Professional bakeries have walk-in proofers; home bakers have smaller units that sit on a counter or tuck into a pantry. The effect is the same: bulk fermentation happens on schedule, final proof is predictable, and the flavor profile is consistent bake to bake.
Proofing boxes also help sourdough starters, where temperature swings between 65F and 85F shift the acid profile from lactic (warm, mild) to acetic (cool, sharp) dramatically. Holding a starter at a steady 75-78F produces consistent feedings and consistent loaves. The price range is wide — $160 for the industry-standard Brod & Taylor down to a free microwave-and-hot-water trick — so match the pick to your volume and seriousness.
What to Look For in a Proofing Box
A good proofing box comes down to how tightly it holds temperature and how it fits your kitchen. Five things matter.
Temperature accuracy. A cheap heating-pad setup can swing plus-or-minus 8-10F, which is enough to ruin consistency. Quality proofers hold within plus-or-minus 2F. Look for digital thermostat control, not a dial with vague markings.
Temperature range. 70-120F covers all bread fermentation needs. 85-95F is the sweet spot for most sourdough. Specialty high-temp proofers that reach 195F serve dual duty as yogurt makers and slow cookers.
Capacity. Can it hold a full bulk-fermentation tub and a banneton simultaneously? Most home proofers accommodate one 12-quart Cambro or one tall banneton plus a shaped loaf.
Humidity control. Some proofers include a water tray; moisture keeps the dough skin from drying out during long proofs. At a minimum, look for a cabinet that will not dry out a loaf over 4 hours.
Footprint and dual use. Brod & Taylor’s folding design disappears into a drawer; sous vide rigs use a cooler you probably already own; DIY boxes take permanent counter space. Several proofers double as yogurt makers, slow cookers, or bread warmers — which matters when counter real estate is scarce.
Top Picks
1. Brod & Taylor Folding Proofer & Slow Cooker — Editor’s Choice
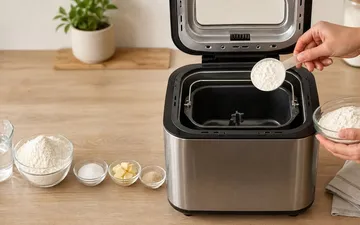
Brod & Taylor Folding Proofer & Slow CookerThe Brod & Taylor Folding Proofer is the uncontested standard for serious home bread bakers. The cabinet folds flat (about 1 inch thick) for storage, opens to an 8-inch tall proofing chamber (interior footprint roughly 15 x 12.5 inches) with a water tray for humidity, and holds temperatures from 70F to 195F with a digital thermostat accurate to plus-or-minus 1-2F. It doubles as a slow cooker, yogurt maker, tempering chamber for chocolate, and a general-purpose low-temp cooker. Price $160-200.
Pros: Folds to 1 inch for storage. Wide temperature range (70-195F). Water tray for humidity. Digital thermostat accurate to plus-or-minus 1-2F. Doubles as slow cooker and yogurt maker. Excellent build quality with a 3-year warranty.
Cons: Highest price in the category. The 8-inch internal height limits you to one bulk tub or banneton at a time. A taller rise needs the lid propped or the rack removed. The heating element is occasionally reported to fail after 3-5 years (Brod & Taylor replaces under warranty, but the inconvenience is real).
Bottom line: The proofer serious bread bakers own. If you bake weekly, buy it and stop thinking about temperature.
2. Sous Vide in an Insulated Cooler — Best DIY
Anova Precision Cooker + Insulated CoolerA surprising number of serious bakers use a sous vide circulator (Anova Precision Cooker, Breville Joule, or similar) clipped to a water-filled insulated cooler as a proofing chamber. Set the wand to 78F, let the water bath equilibrate, and place your banneton in a waterproof bag or plastic container inside the cooler. The water provides thermal mass and precise temperature control; the cooler provides insulation. Total cost if you already own a sous vide: about $30 for an insulated cooler. Buying from scratch: $100-150 for the sous vide plus $30-50 for the cooler.
Pros: Dual-purpose (cook and proof). Precise temperature control (plus-or-minus 0.1F typical for the sous vide). Large capacity — a full cooler holds multiple loaves. Already on many kitchen counters.
Cons: Requires a large cooler that is not always easy to store. Proofing in a humid water-bath environment requires a waterproof dough container or sealed bag. The water bath is slow to come up to temperature (30+ minutes).
Bottom line: The clever hack if you already have the sous vide; buying fresh for proofing alone is overkill.
3. Kitchen Workhorse Proofing Cabinet — Best Mid-Range
Kitchen Workhorse Proofing CabinetKitchen Workhorse (and similar brands in this category — the segment has several interchangeable offerings) makes a non-folding proofing cabinet with a PTC heating element, digital thermostat, and a clear front door. Temperatures adjustable from 65F to 110F, accurate within plus-or-minus 2-3F. Capacity accommodates two bannetons or one large bulk-fermentation tub. Price $80-120.
Pros: Dedicated single-purpose design — no menu-diving to find proof mode. Clear door for checking dough without opening. Digital thermostat. Larger capacity than Brod & Taylor. Moderate price.
Cons: Not foldable — occupies counter or pantry space permanently. Build quality is noticeably below Brod & Taylor (thinner plastic, simpler electronics). Support varies by seller; some are rebadged imports with no US warranty. Temperature accuracy of plus-or-minus 3F is adequate but not ideal.
Bottom line: The right choice if you want a dedicated proofer and the Brod & Taylor price is a stretch.
4. BalanceFrom Heated Mat + Insulated Cover — Best Budget
BalanceFrom Heated Mat + Inkbird ThermostatA heated seedling mat (BalanceFrom and similar brands) set at 78-82F under an insulated cover makes a workable proofing setup for about $30-45. Set the mat on a counter, place a towel over the dough bowl, drop an insulated cover over the top (a plastic bin inverted over the bowl, or a purpose-built proofing dome) and the heat equilibrates. Temperature accuracy is the weakness: most seedling mats have a vague dial thermostat with plus-or-minus 8-10F swings. Adding a separate thermostat controller (Inkbird or similar, $25-35) gets you to plus-or-minus 2-3F.
Pros: Cheap. Components are multi-use (seedling mats help in spring; thermostat controllers work with many heating devices). Compact storage.
Cons: Without a separate thermostat, temperature accuracy is poor. The “cabinet” is a DIY assembly that looks unprofessional. Not a long-term solution for serious baking.
Bottom line: A real starter setup; expect to graduate to a proper proofer within a year if you keep baking.
5. Insulated Box with a Bowl of Warm Water — Best Free Option
No affiliate link for this one — because it is free.
The oldest trick in bread baking is to put a bowl of hot (not boiling) water in a closed microwave or small insulated cooler alongside the dough. The water radiates heat for 30-45 minutes, bringing the enclosed space to roughly 80F. Swap in fresh hot water every 30 minutes to maintain temperature. For a 4-hour bulk fermentation this is an exhausting workflow, but for a 30-minute final warm-up or a short proof, it works.
Pros: Free. Uses equipment you already own. Works surprisingly well for short proofs.
Cons: Requires constant attention — swapping water every 30-45 minutes. Not viable for overnight proofs. No precise temperature — you are guessing based on how hot the water started.
Bottom line: A proof-of-concept for temperature control that will sell you on buying a real proofer.
Honest Comparison
Bread Proofing Boxes Compared
| Feature | 01Brod & Taylor Folding | 02Sous Vide + Cooler | 03Kitchen Workhorse | 04BalanceFrom Mat Kit | 05Microwave + Hot Water |
|---|---|---|---|---|---|
| Price | $160-200 | $30 (add'l) to $200 | $80-120 | $30-80 | Free |
| Temp Range | 70-195F | Water bath range | 65-110F | 70-100F approx | Approx 80F |
| Accuracy | +/- 1-2F | +/- 0.1F | +/- 2-3F | +/- 8-10F (or +/- 2-3F w/ Inkbird) | Uncontrolled |
| Capacity | 1 large banneton | Multiple loaves | 2 bannetons or tub | Medium bowl | Single bowl |
| Storage | Folds to 1 inch | Cooler + wand | Counter-permanent | Compact when apart | Microwave |
| Dual Use | Slow cooker, yogurt | Cooking | Proof only | Inkbird w/ other heaters | Microwave |
| Best For | Serious home baker | Sous vide owner | Dedicated proofer, budget | Beginner / testing | Curiosity trial |
For the serious home baker, Brod & Taylor is the unambiguous best buy. For the sous-vide-owning baker, the cooler-plus-wand approach is elegant. For beginners on a budget, a heated mat plus an external thermostat is enough to prove the concept. The free microwave-and-hot-water trick is for skeptics who want to confirm the effect before investing.
Using a Proofer Effectively
Set the proofer to match the fermentation stage, not a single fixed number. The targets below cover almost every home loaf.
Bulk fermentation: Set to match your target desired dough temperature, typically 76-78F for lean doughs, 78-80F for enriched. Place the bulk tub inside, close the door, walk away. Check at the midpoint to fold if your recipe calls for it.
Final proof: Set 2-4F below the bulk temperature for a more controlled final rise. Many bakers use 74F for final proof after 78F bulk. Add humidity (water tray) if drying-out is a problem in your setup.
Sourdough starter: Set to 75-78F for maintenance feeds. A held-stable starter produces more consistent loaves than one that lives on a counter with daily temperature swings.
Cold retarding: A proofer is for warm environments. To cold-retard, you still need a refrigerator — the proofer complements rather than replaces it.
Proofer Temperature Targets by Use
Final proof (controlled)
72–76°FSlower, more predictable rise after bulk
Sourdough starter maintenance
75–78°FBalanced lactic-acetic profile
Bulk fermentation — lean doughs
76–78°FBaguette, country bread, ciabatta
Bulk fermentation — whole grain
78–80°FWhole wheat, rye, spelt
Faster bulk — whole grain at temp
82–85°FHamelman: high-rye DDT 82-85F
For the full fermentation science behind why temperature matters, see our fermentation science guide, and for timing tables our bulk fermentation walkthrough.
This article contains affiliate links. If you buy through them, we earn a small commission at no extra cost to you. We only recommend tools we have personally used or tested through consistent baker feedback.
— Jay Arr
Frequently Asked Questions
- Is the Brod & Taylor worth the price over a DIY setup?
- If you bake weekly, yes. The Brod & Taylor's combination of folding storage, precise digital thermostat, wide temperature range (70-195F), and dual-duty use (slow cooker, yogurt, tempering) makes it an all-purpose tool that lives in a drawer when unused. A DIY setup with a sous vide or a heated mat plus thermostat approaches similar performance but takes permanent counter space and requires more setup each time. For occasional bakers, DIY is the better economic choice.
- How long should a proofing box last?
- The Brod & Taylor is built for 5-10 years of regular home use; the heating element is the most common failure point, typically replaced under warranty within the 3-year period. Dedicated proofing cabinets in the mid-range ($80-120) often last 3-5 years before thermostat or heater issues emerge. Sous-vide-based setups inherit the lifespan of the sous vide (5-10 years for quality models).
- Can I use my oven as a proofer?
- Sort of. Many ovens have a proof mode (typically 85-90F); older ovens can be warmed by turning the oven light on, which produces about 4-6F above ambient. Neither matches a dedicated proofer for accuracy. The oven-light trick works for a short rise but is unreliable for anything past 2 hours. Ovens with digital proof modes are a better substitute but still vary plus-or-minus 5F.
- What temperature should I set my proofer for sourdough?
- Starter maintenance: 75-78F holds a balanced lactic-to-acetic ratio. Bulk fermentation: 76-78F for most formulas, 78-80F for whole-grain-heavy loaves. Final proof: 74-76F for slower, more controlled fermentation. Higher temperatures (82F+) speed fermentation but shift flavor toward lactic and reduce the window before overproofing.
- Does humidity matter in a proofing box?
- Some. Without humidity, the dough skin dries over 3-4 hours and scoring becomes tougher, though the result is often fine. A water tray in the proofer adds enough humidity to keep the dough surface supple. For cold-retarded loaves, a banneton with a loose cover in the fridge achieves the same effect at lower temperatures.