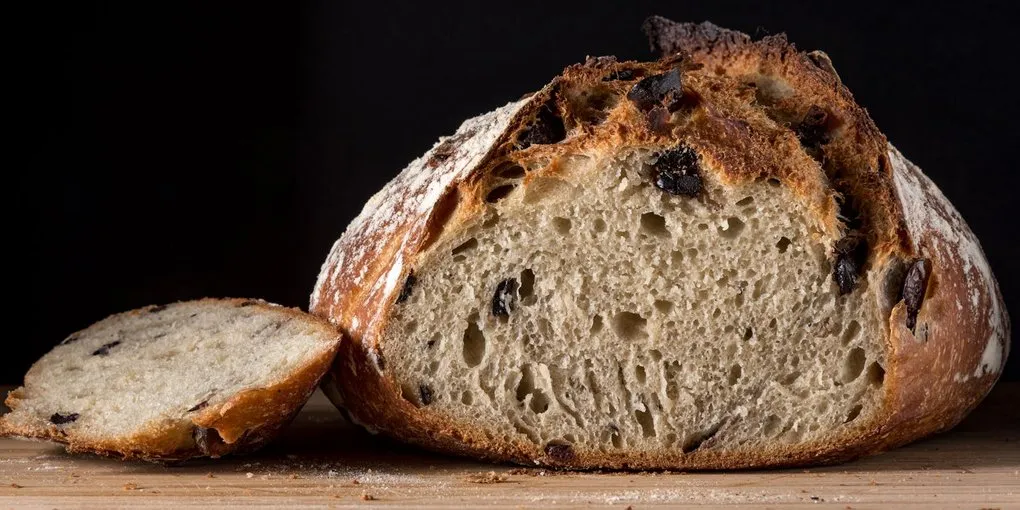
Olive rosemary bread is one of the best arguments for learning to bake with mix-ins. The bread itself is a lean, crusty loaf — country bread at its core — with briny, meaty olives and sharp rosemary folded through the crumb. Every slice is different. Some bites are pure bread. Others hit a pocket of olive that bursts with salt and oil. The rosemary threads through everything, releasing fragrance when the crust cracks open.
The technique matters more than the recipe here. Olives and rosemary are delicate inclusions — add them at the wrong time and you’ll crush the olives into a purple paste, shred the rosemary into invisible fragments, and stain the crumb instead of studding it. Add them at the right time and they hold their shape, distribute evenly, and create distinct pockets of flavor throughout the loaf.
When to Add Mix-Ins: The Critical Timing
Mix-ins go into the dough during the last stretch-and-fold of bulk fermentation — not during mixing.
This is the single most important technique for any bread with inclusions. Robertson’s method calls for stretch-and-fold every 30 minutes for the first 2 hours of bulk fermentation, with the dough then resting undisturbed for the remaining 1-2 hours. The inclusions go in during that final fold — the last one before you leave the dough alone to finish its bulk rise.
Why the last fold? Three reasons.
Preserving inclusion integrity. If you add olives during initial mixing — whether by hand or in a stand mixer — the mechanical action crushes them. You end up with olive-flavored bread instead of bread with olives in it. The difference matters. By the final fold, you’re doing gentle stretch-and-fold movements, not aggressive kneading. The olives stay whole or in large halves.
Gluten development first. The dough needs a functional gluten network before you start loading it with non-gluten ingredients. Olives are slippery, oily, and heavy. Rosemary is fibrous and cuts through gluten strands. Adding them too early interferes with gluten formation. By the final fold, the gluten network is already established and can accommodate the disruption.
Even distribution. A developed, airy dough distributes inclusions more evenly during folding than a dense, just-mixed dough does. The stretch-and-fold action layers the olives and rosemary throughout the dough in a natural, irregular pattern — exactly what you want in the finished bread.
The Base Dough: Lean and Simple
This bread starts with a lean dough — flour, water, salt, and leavening. No butter, no eggs, no sugar. The simplicity of the base lets the olives and rosemary take center stage.
The formula mirrors a basic country bread. Robertson’s country loaf runs at 75% hydration; Forkish’s overnight version hits 78%. For olive rosemary bread, you need to account for the fact that olives release moisture into the dough. Kalamata olives are about 75% water by weight, and that water seeps out during fermentation and baking. If you start at 75% hydration and then add wet olives, the effective hydration creeps higher.
The solution: start the base dough at 70% hydration. This is slightly stiffer than a typical country bread, which gives the dough enough structure to support the heavy olives without spreading flat. The moisture from the olives brings the effective hydration into the 73-75% range during baking — right where you want it for an open but manageable crumb.
You can leaven this bread with sourdough or a poolish. Both work well. Sourdough adds a subtle tang that complements the brininess of the olives. A poolish (equal parts flour and water with a tiny amount of yeast, fermented 12-16 hours) gives a sweeter, nuttier background without acidity. The recipe below uses a poolish for accessibility, with a sourdough variation noted. For more on pre-ferments, see our dedicated guide.
The Recipe
Yield: 2 boules
Poolish (12-16 hours ahead)
| Ingredient | Weight | Notes |
|---|---|---|
| Bread flour | 200g | — |
| Water (68-72 degrees F) | 200g | Room temp |
| Instant dry yeast | 0.5g | A tiny pinch |
Mix in a container, cover loosely, and ferment at room temperature for 12-16 hours. It’s ready when the surface is domed and just beginning to recede at the center. If the surface has fully collapsed, it’s over-fermented — use it anyway, but expect a slightly more acidic result.
Main Dough
| Ingredient | Weight | Baker’s % |
|---|---|---|
| Bread flour | 600g | 100% (with poolish flour) |
| Water (80 degrees F) | 360g | 60% (of final dough flour only) |
| Poolish (all) | 400g | — |
| Salt | 16g | 2% |
| Instant dry yeast | 2g | 0.25% |
Note on hydration math: Total flour = 600g dough flour + 200g poolish flour = 800g. Total water = 360g dough water + 200g poolish water = 560g. Overall hydration: 70%. The olive moisture will bring effective hydration to approximately 73-75%.
Mix-Ins (added during final fold)
| Ingredient | Weight | Baker’s % |
|---|---|---|
| Kalamata olives, pitted, halved | 200g | 25% |
| Fresh rosemary, roughly chopped | 12g | 1.5% |
Olive prep: Pit the olives and cut in half. Spread on a paper towel for 15 minutes to blot excess brine. Don’t rinse — the brine carries flavor. Don’t chop — halves hold up better in the dough than small pieces.
Rosemary prep: Strip leaves from stems. Chop roughly — you want 1-2cm pieces, not a fine mince. Larger pieces release flavor gradually during baking and stay visible in the crumb.
Equipment
- Kitchen scale
- Large mixing bowl or stand mixer
- Bench scraper
- Two bannetons or bowls lined with floured towels
- Dutch oven
- Lame or sharp razor blade
Method
Step 1: Autolyse (30 minutes)
Combine the 600g bread flour and 360g water in a large bowl. Mix until no dry flour remains. Cover and rest for 30 minutes. This hydrates the flour and begins passive gluten development. Hamelman notes autolyse is especially effective for breads where you want to minimize mixing — which is exactly the case here, since aggressive mixing would oxidize the dough and strip flavor.
Step 2: Mix
Add the poolish, salt, and yeast to the autolysed dough. Mix on low speed for 3 minutes, then medium for 4-5 minutes. By hand, use the pincer method for 5-6 minutes — squeeze through with thumb and forefinger, fold, rotate, repeat.
The dough should be smooth, moderately tacky, and pass a windowpane test. Target dough temperature: 76-78 degrees F.
Do not add the olives and rosemary yet.
Step 3: Bulk Fermentation (3-4 hours)
Transfer to a lightly oiled container. Perform stretch-and-fold sets every 30 minutes for the first 2 hours — four sets total.
Sets 1-3: Standard stretch-and-fold. Reach under, stretch up, fold over. Four sides per set.
Set 4 (the final fold) — add the mix-ins: Spread the dough out gently in the container or on a lightly floured surface. Scatter the olive halves and chopped rosemary evenly across the surface. Now perform the stretch-and-fold: reach under one side, stretch up and over the olives, fold to the center. Rotate and repeat on all four sides. The olives and rosemary get layered into the dough. You may need 2-3 extra folds to distribute them. Be gentle — don’t knead or squeeze the olives.
After the mix-in fold, leave the dough undisturbed for the remaining 1-2 hours of bulk fermentation. It should increase by 20-30% in volume and feel airy and pillowy when you tilt the container.
For more on fermentation science, see our fermentation guide.
Step 4: Pre-shape and Bench Rest (20 minutes)
Turn the dough out onto a lightly floured surface. Divide into two equal pieces. Pre-shape each into a loose round, tucking the edges under to create some surface tension. Any olives that fall out can be tucked back into the seam. Cover and rest for 20 minutes.
Step 5: Final Shape
Shape each piece into a boule. Work on an unfloured section of the counter — the slight stickiness provides the friction you need to build surface tension. Cup your hands around the dough and rotate it, letting the counter pull the outer skin taut. The seam goes underneath.
Transfer each boule seam-up into a well-floured banneton. Use a mix of rice flour and wheat flour in the banneton — it prevents sticking better than wheat flour alone.
For shaping technique details, see our shaping guide.
Step 6: Final Proof (1-1.5 hours room temp, or overnight in the fridge)
Cover the bannetons. Proof at room temperature for 1-1.5 hours. Check with the poke test — press a floured finger gently into the dough. If it springs back slowly and leaves a slight indent, it’s ready.
Overnight retard option: Cover tightly with plastic wrap and refrigerate immediately after shaping. Bake straight from the fridge the next morning. Cold retarding firms the dough for better scoring, deepens flavor, and gives you scheduling flexibility. Forkish confirms: “The chilled loaves don’t need to come to room temperature first.”
Step 7: Score and Bake
Preheat Dutch oven at 475 degrees F for 45 minutes. Turn the proofed loaf out of the banneton onto a piece of parchment. Score with a lame or razor blade — a single deep slash or a square pattern both work well. The scoring creates controlled expansion points so the loaf rises evenly instead of splitting around the olives.
Lower the loaf into the hot Dutch oven. Lid on: 25 minutes (steam phase). Lid off: 20-25 minutes until the crust is deep mahogany. Robertson and Forkish both insist on baking darker than your instinct says — “deep mahogany, not pale gold.”
Internal temperature: 205-210 degrees F. The olives make the interior slightly wetter than plain country bread, so err on the higher side.
Step 8: Cool
Cool on a wire rack for at least 1 hour. Two hours is better. The olives retain heat and the crumb around them sets more slowly. Cutting too early produces gummy patches around each olive.
Scoring and Proofing Interaction
Scoring depth depends on your proof level. Buehler’s principle: under-proofed dough needs deeper cuts because vigorous expansion is ahead. Properly proofed dough gets medium-depth cuts. Over-proofed dough gets very shallow cuts — deep cuts will deflate an exhausted gluten network.
With olive bread, the stakes are slightly higher. Olives create heavy spots in the dough, and poor scoring combined with over-proofing produces a loaf that tears unpredictably around the olive pockets. Score with confidence when the poke test is right, and don’t second-guess the oven spring — the Dutch oven’s trapped steam will handle the rest.
Variations
Sourdough base: Replace the poolish with 200g of active sourdough starter (100% hydration). Reduce bread flour by 100g and water by 100g in the main dough. Omit the instant yeast. Bulk fermentation extends to 4-5 hours. The sourdough tang and olive brine are a natural pairing.
Green olive and thyme: Swap Kalamata olives for Castelvetrano olives (buttery, mild) and replace rosemary with fresh thyme. Milder, more herbal, less briny.
Sun-dried tomato and olive: Add 80g oil-packed sun-dried tomatoes (drained and roughly chopped) alongside the olives. The tomatoes add sweetness and acidity that balance the olive brine.
Focaccia variation: Press the dough into an oiled sheet pan after bulk fermentation, dimple the surface, scatter olives and rosemary on top (no folding in), drizzle with olive oil, and bake at 450 degrees F for 20-25 minutes. The inclusions sit on the surface instead of inside the crumb. See our focaccia guide for the full technique.
Troubleshooting
Olives crushed into paste, purple-streaked crumb: Added during mixing instead of the final fold. Next time, save inclusions for the last stretch-and-fold set and handle gently.
Olives all sinking to the bottom: Dough was too wet or too slack. Reduce hydration by 2-3% next time, or shape more tightly so the olives are trapped in the dough structure.
Bland despite olives: Blotting is good but rinsing olives strips their flavor. Use brine-packed Kalamata olives, not canned black olives (which are mild to the point of tasteless). Also check your salt — the dough itself needs 2% salt in addition to whatever salt the olives carry.
Dough too wet and spreading flat: The olives released more moisture than expected. Some olive brands are wetter than others. Next time, blot more aggressively on paper towels before adding, or reduce the dough water by 20-30g.
Frequently Asked Questions
- When should I add olives and rosemary to bread dough?
- During the last stretch-and-fold of bulk fermentation -- not during mixing. Adding inclusions during mixing crushes olives into paste and shreds rosemary into invisible fragments. By the final fold, the gluten network is already developed and the gentle folding motion layers olives and rosemary through the dough without destroying them. Spread the inclusions over the dough surface, then fold from all four sides to incorporate.
- Do olives affect bread hydration?
- Yes. Kalamata olives are roughly 75% water by weight, and they release moisture into the dough during fermentation and baking. Start your base dough at 70-72% hydration -- slightly lower than a typical country bread -- so that olive moisture brings the effective hydration into the 73-75% range. If your dough feels too wet after adding olives, you started with too much water in the base.
- Can I use any type of olive in bread?
- Brine-packed Kalamata olives are the standard choice -- they're firm, flavorful, and hold their shape during baking. Castelvetrano olives (buttery, mild green) are an excellent alternative. Avoid canned black olives -- they're bland and too soft. Oil-cured olives work but are very salty, so reduce the dough salt by 0.5% if using them. Always pit and halve olives before adding. Whole olives create oversized pockets and are harder to distribute evenly.
- Should I use sourdough or commercial yeast for olive bread?
- Both work well. A poolish (equal parts flour and water with a trace of yeast, fermented 12-16 hours) gives a sweeter, nuttier background that lets the olives and rosemary dominate. Sourdough adds a subtle tang that pairs naturally with olive brine -- the acidity and saltiness complement each other. Sourdough also extends shelf life because the lower pH inhibits mold growth and slows staling.
- Why did my olive bread turn out with purple-streaked crumb?
- The olives were crushed during mixing. This happens when inclusions are added at the initial mix stage, where kneading or stand mixer action breaks them apart. The fix: add olives only during the final stretch-and-fold, and handle them gently. Halve the olives rather than chopping them -- halves maintain their structure better than small pieces. Blot excess brine on a paper towel before adding, but don't squeeze the olives.