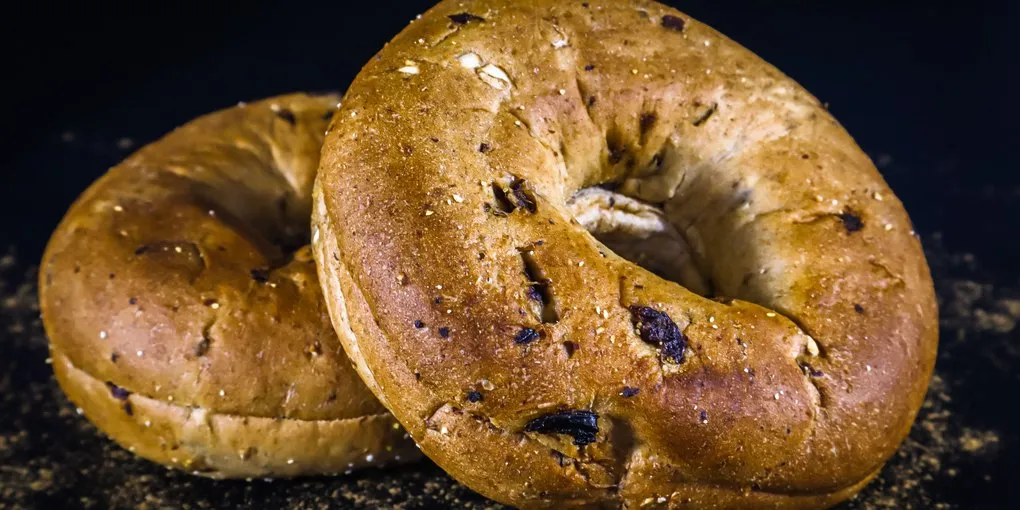
Sourdough bagels combine wild fermentation and boiling. A stiff levain and an overnight cold retard build the tangy, complex flavor and extended shelf life that commercial yeast cannot match, while a 60-second-per-side boil gelatinizes the surface into the thin, chewy skin that defines a real bagel. The process spans two days but the active time is short: mix and shape day one, boil and bake day two. Bake at 450F until deeply golden, internal temperature 200 to 205F.
Sourdough bagels combine two of bread baking’s most distinctive techniques — wild fermentation and boiling. The sourdough provides flavor complexity that develops over a long, slow fermentation. The boiling bath gelatinizes the exterior starch into a thin, chewy skin that’s the defining texture of a real bagel. Together, they produce something that’s significantly better than anything you’ll find in a plastic bag at the grocery store, and meaningfully different from standard yeasted bagels.
The process spans two days but the active time is short. You build the dough, shape the bagels, and refrigerate them overnight. The next morning, you boil and bake. The cold retard does what it always does in sourdough baking — it provides scheduling flexibility, firms the dough for easier handling, and develops flavor compounds that a straight room-temperature fermentation can’t match.
Why Sourdough Changes Bagels
A sourdough bagel is not just a yeasted bagel that took longer to rise. The microbiology is fundamentally different, and that difference shows up in flavor, texture, and shelf life.
Sourdough cultures contain both wild yeast and lactic acid bacteria (LAB). The yeast provides leavening. The bacteria produce organic acids — lactic acid and acetic acid — that create the complex, tangy flavor profile associated with sourdough. The longer the fermentation, the more organic acids accumulate. More acids mean more flavor complexity and a lower pH that inhibits mold growth.
The practical result: sourdough bagels keep 5-6 days at room temperature compared to 2-3 days for straight yeasted doughs. For a batch of 8-10 bagels that you’re eating over a week, that extended shelf life means fewer wasted bagels.
The acids also affect the crumb. A slightly lower pH makes the gluten network more extensible, producing a chewier interior that has more give when you bite through it. Combined with the stiff hydration (55-58%), you get the dense, satisfying chew that defines a good bagel.
For a deeper dive into sourdough fundamentals, see our beginner sourdough guide and our sourdough vs. yeast comparison.
Sourdough Bagels vs. Yeasted Bagels
Same shape, different fermentation -- here's what changes
| Attribute | 01Sourdough Bagels | 02Yeasted Bagels |
|---|---|---|
| Fermentation TimeSourdough wins on flavor development | 14-18 hours (overnight) | 1-2 hours |
| Flavor ComplexitySourdough wins | High -- organic acids, esters, alcohols | Moderate -- yeast-derived only |
| TangPreference | Noticeable, characterful | None |
| Shelf LifeSourdough wins -- lower pH inhibits mold and slows staling | 5-6 days | 2-3 days |
| Effort LevelYeasted wins on convenience | Moderate (active starter required) | Low |
| TextureComparable | Dense, chewy, more developed | Dense, chewy, straightforward |
| SchedulingYeasted wins on speed | Mix evening, boil/bake morning | Same-day, 3-4 hours |
Both produce legitimate bagels. Sourdough rewards patience with deeper flavor and 2-3x longer shelf life.
jayarrbread.comBuilding the Stiff Levain
This recipe uses a stiff levain at 60% hydration rather than a standard 100% hydration starter. The reason is clear: stiff cultures favor acetic acid production, which means a more assertive, complex flavor. The lower hydration and cooler fermentation temperature create an environment where heterofermentative LAB produce more acetic acid relative to lactic acid. The result is a bagel with a sharper, more characterful tang — not the mild, yogurt-like flavor of a high-hydration levain.
Build the levain 10-12 hours before mixing:
| Ingredient | Weight |
|---|---|
| Mature sourdough starter | 25g |
| Bread flour | 100g |
| Water (75°F) | 60g |
Mix until a stiff ball forms. It should feel like a firm, smooth dough — not a batter. Cover and let ferment at cool room temperature (65-70°F) for 10-12 hours. The cooler temperature and stiff consistency both push the fermentation toward acetic acid production.
The levain is ready when it has domed, shows cracks on the surface, and smells pleasantly sharp — more like sourdough bread than yogurt. If it hasn’t domed after 12 hours, your starter may need a few days of consistent feeding to build strength. See our sourdough feeding schedule for revival tips.
Try It Yourself
The Starter Clock
Track your levain's fermentation and catch the domed, cracked peak that gives sourdough bagels their sharp, characterful tang.
Open ToolThe Recipe
Yield: 8 bagels
Ingredients
| Ingredient | Weight | Baker’s % |
|---|---|---|
| Bread flour | 500g | 100% |
| Water (78-80°F) | 265g | 53% |
| Stiff levain (60% hydration) | 185g | 37% |
| Salt | 11g | 2.2% |
| Barley malt syrup (non-diastatic) | 15g | 3% |
Effective hydration: ~57% (accounting for flour and water in the levain). This is a stiff dough — the stiffest in this recipe collection. It should feel firm, smooth, and resist stretching. That stiffness is essential. Bagels need a dense, tight crumb with small, uniform holes. High hydration produces open, airy crumb — the opposite of what you want.
Barley malt syrup adds a subtle malty sweetness characteristic of traditional bagels. Use non-diastatic malt (heat-treated, no active enzymes). Diastatic malt contains live amylase enzymes that would over-convert starch to sugar in a long fermentation, producing an overly brown, sticky crust. If you can’t find malt syrup, substitute honey or brown sugar at the same weight.
Boiling Liquid
| Ingredient | Amount |
|---|---|
| Water | 4 quarts |
| Barley malt syrup or honey | 2 tablespoons |
| Baking soda | 1 teaspoon (optional — boosts browning) |
Equipment
- Kitchen scale
- Stand mixer with dough hook (strongly recommended — this dough is very stiff)
- Large pot for boiling
- Slotted spoon or spider strainer
- Baking sheet + parchment paper
- Probe thermometer
Method
Step 1: Mix the Dough (Evening, Day 1)
Tear the stiff levain into small pieces and add to the mixing bowl with the flour, water, malt syrup, and salt. Mix on low speed for 4-5 minutes. The dough will feel unusually stiff — the mixer may strain. This is normal for 57% hydration.
Increase to medium speed for 4-5 minutes. The dough should become smooth and firm, pulling cleanly from the bowl. It won’t be tacky or sticky. If it feels slack, you’ve added too much water — incorporate an additional tablespoon of flour.
This dough doesn’t need a windowpane test. Bagel dough is developed to moderate gluten — enough for structure, not enough for the extensibility you’d want in country bread. A short, firm pull that resists stretching is what you’re looking for.
Step 2: Bulk Fermentation (1.5-2 hours)
Cover and let rest at room temperature (75-78°F) for 1.5-2 hours. The dough should expand by about 30-40% — less dramatic than a lean bread because the stiff hydration limits gas cell expansion.
One fold at the 45-minute mark. The fold is mostly for temperature equalization and redistributing the yeast population — the dough is stiff enough that it doesn’t need much structural support from folding.
Step 3: Divide and Shape
Turn out onto a clean, unfloured surface. Divide into 8 equal pieces (about 120g each).
Shaping method — the poke-through:
- Round each piece into a tight ball. Cup your hand, press down, and roll against the counter. The friction creates surface tension.
- Let the balls rest under a towel for 5 minutes.
- Press your floured thumb through the center of each ball. Stretch the hole gently with both thumbs and forefingers until it’s about 2 inches in diameter. The hole will shrink during proofing and boiling — make it larger than you think you need.
Alternative — the rope method:
- Roll each piece into a rope about 9 inches long.
- Wrap the rope around your hand, overlapping the ends by about 1.5 inches.
- Roll the overlapped section on the counter to seal.
The poke-through method is easier and produces more consistent results. The rope method gives a slightly different texture at the seam.
Place shaped bagels on a parchment-lined baking sheet, spacing 2 inches apart.
Step 4: Overnight Cold Retard (8-14 hours)
Cover the sheet tightly with plastic wrap and refrigerate overnight.
During the cold retard at 37-40°F, yeast activity slows to near zero. But the acetic acid bacteria in your sourdough culture remain slightly active even at these temperatures. This means acid development continues — slowly — while gas production essentially stops. The result is more flavor complexity without the risk of over-proofing.
The cold also firms the dough, which is critical for bagels. Cold, stiff bagels hold their shape better during the boiling step. Warm, slack bagels spread and lose their round form in the hot water.
For more on cold retarding science, see our cold fermentation guide.
Step 5: The Float Test (Morning, Day 2)
Before heating the water, test one bagel. Drop it into a bowl of room-temperature water. If it floats within 10 seconds, the bagels are proofed and ready to boil. If it sinks and stays down, the bagels need more time — leave them at room temperature for 30-60 minutes and test again.
This is the same principle as the classic float test for leaven readiness — sufficient gas production makes the dough buoyant.
Step 6: Boil
Preheat the oven to 450°F with a rack in the center position.
Bring 4 quarts of water to a rolling boil. Add the malt syrup (or honey) and baking soda. The malt in the boiling water adds flavor and contributes to the characteristic glossy, mahogany crust. The baking soda raises the pH of the water, which accelerates Maillard browning during the subsequent bake.
Working in batches of 2-3, lower the bagels into the boiling water. Boil 60 seconds per side, flipping once with a slotted spoon or spider. The boiling gelatinizes the outer layer of starch, creating a thin, chewy skin that seals the surface. This skin is why bagels have that distinctive crisp-then-chewy bite — the exterior and interior have fundamentally different textures.
Remove boiled bagels to the parchment-lined sheet. If adding toppings (sesame, poppy, everything mix, salt), press them onto the wet surface immediately after boiling — the gelatinized starch is sticky and acts as natural glue.
Step 7: Bake (18-22 minutes)
Bake at 450°F for 18-22 minutes, rotating the sheet halfway through. The bagels are done when deeply golden brown — aim for the “go darker” principle that serious bakers champion. A pale bagel is an under-baked bagel.
Internal temperature should reach 200-205°F. The exterior should feel firm and sound hollow when tapped on the bottom.
Let cool on a wire rack for at least 15 minutes before slicing. The crumb is still setting during this time.
Toppings
Apply toppings immediately after boiling, while the surface is wet and sticky:
- Plain: No topping. Let the crust speak.
- Sesame: Press the top into a plate of sesame seeds.
- Poppy: Same technique, poppy seeds.
- Everything: Sesame seeds, poppy seeds, dried garlic flakes, dried onion flakes, flaky salt.
- Salt: Coarse pretzel salt or flaky sea salt only. Table salt dissolves.
- Onion: Dried onion flakes, or caramelized onion pressed into the surface.
Sourdough Bagels vs. Yeasted Bagels
Both approaches produce legitimate bagels. The yeasted version is faster and simpler. The sourdough version rewards patience with deeper flavor and longer freshness. If you already maintain a sourdough starter for other baking — country bread, for instance — the sourdough bagel process slots naturally into your routine.
For the classic yeasted approach, see our homemade bagels guide.
Troubleshooting
Bagels are flat and wide instead of tall and round: Over-proofed. The gluten structure relaxed too much before baking. Reduce the cold retard time, or shape the bagels tighter with a smaller hole (it will expand).
Bagels wrinkled after boiling: Under-proofed. The interior didn’t have enough gas structure to support the gelatinized skin. Give them more time at room temperature before boiling.
Crust is tough and leathery: Boiled too long. Keep it to 60 seconds per side. Longer boiling creates a thicker gelatinized layer that bakes into a tough shell.
Crumb is too open and airy: Hydration was too high, or the dough was too warm during shaping. Stick to 57% hydration and keep the dough cool. Bagels should have a tight, dense crumb with small, uniform holes.
No tang — tastes like regular bread: The levain wasn’t acidic enough. Use a stiff levain (60% hydration), ferment at a cooler temperature (68-72°F), and give it the full 10-12 hours. The stiff consistency and cooler temperature both favor acetic acid production.
Toppings fell off during baking: They weren’t applied immediately after boiling. The gelatinized surface dries quickly — you have about 30 seconds to press toppings in before the natural stickiness fades.
Storing Sourdough Bagels
Room temperature in a sealed bag: 5-6 days. The organic acids from sourdough fermentation lower the pH enough to significantly slow mold growth and retrogradation. This is one of the practical advantages of sourdough bagels over yeasted — you bake a batch of 8 and they’re still good by Friday.
For longer storage, slice the bagels before freezing. A frozen, pre-sliced bagel goes directly into the toaster — no thawing needed. Freeze up to 3 months.
As with all bread, never store fresh bagels in the refrigerator. The 2-4°C temperature range accelerates retrogradation — bagels go stale faster in the fridge than on the counter. If you keep a jar of starter going, don’t miss our sourdough discard recipes for the daily discard.
Frequently Asked Questions
- Why do you boil bagels before baking?
- Boiling gelatinizes the outer layer of starch, creating a thin, chewy skin that defines bagel texture. This gelatinized layer seals the surface -- steam and gas can't escape as easily during baking, which keeps the interior dense and chewy rather than open and airy. The boiling water typically contains malt syrup, which adds flavor and contributes to the characteristic glossy, mahogany crust. Without boiling, you'd get a round bread roll, not a bagel.
- How long should you boil bagels?
- 60 seconds per side -- 2 minutes total. Longer boiling creates a thicker gelatinized layer that bakes into a tough, leathery crust. Shorter boiling doesn't gelatinize enough starch, producing a crust that's too thin and bready. Keep the water at a rolling boil (not a gentle simmer) and flip once with a slotted spoon. Work in batches of 2-3 so the water temperature doesn't drop too much.
- Can you use sourdough discard for bagels?
- You can, but the results will differ. Discard is acidic but may lack active yeast populations -- it provides flavor but not reliable leavening. If using discard, add a small amount of commercial yeast (about 1 teaspoon / 4g) to the dough to ensure adequate rise. The better approach is to build a fresh stiff levain from your starter at 60% hydration, which gives you both active yeast and the acetic acid character that works so well in bagels. For more discard ideas, see our sourdough discard recipes.
- Why are my bagels wrinkled after boiling?
- Wrinkled bagels are under-proofed. The interior didn't develop enough gas structure to support the gelatinized skin -- when the skin sets during boiling, it doesn't have enough internal pressure pushing outward, so it wrinkles. Before boiling, test one bagel by dropping it in room-temperature water. If it floats within 10 seconds, the batch is ready. If it sinks, leave the bagels at room temperature for 30-60 minutes and test again.
- How do sourdough bagels compare to regular bagels for shelf life?
- Sourdough bagels last 5-6 days at room temperature versus 2-3 days for yeasted bagels. The organic acids produced during sourdough fermentation lower the dough's pH, which inhibits mold growth and slows starch retrogradation (the re-crystallization process that causes staling). Store in a sealed bag at room temperature -- never in the refrigerator, where the 2-4°C temperature actually accelerates staling. For longer storage, slice and freeze; they go directly from freezer to toaster.